
Backend Mode
To use the Themify Builder in backend:
- First add or edit a post/page.
- Below the content editor (make sure the post is saved/published), you will find the “Themify Custom Panel > Themify Builder” tab like the screenshot below
- Drag & drop the module to the column/grid to add modules
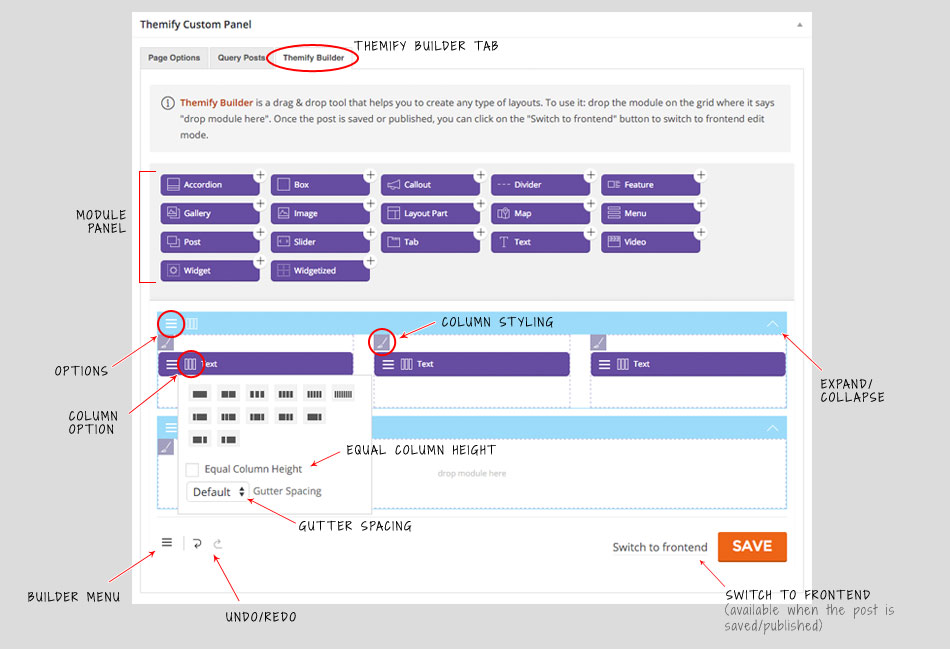
- Module Panel
- Undo/redo any Builder modifications before saving or closing the Builder
- To add modules:
- drag module from the Module Panel to the Builder column
- click on the module + icon will also add the module
- Row (Note: copy/paste and import/export features are only available on Builder frontend edit mode.)
- Hover the row menu icon to access row options:
- Options = row options & styling
- Duplicate = duplicate row
- Delete = delete row
- Hover the row menu icon to access row options:
- Drag row top bar up/down to re-position the row
- Column Option
- To change the column arrangement: hover the column option icon on the row and click on the desired arrangement icon. Each row can be arranged up to maximum 6 columns
- Equal Column Height: When enabled this option ensures that all the column on the same row has the same height column container
- Gutter Spacing: is the vertical spacing between columns
- Sub-columns: to make sub-columns, hover the column option icon on the module and click on the desired arrangement icon.
- NOTE: only one level of sub-columns is allowed (ie. you can’t do sub-columns within sub-columns).
- Module
- Drag and drop module to re-position the module
- Module options:
- Edit = edit module options (TIPS: double-click on the module overlay area will bring up module options as well)
- Duplicate = duplicate module
- Delete = delete module
- Builder Menu:
- Duplicate this page = duplicate the current page and its Builder content
- Import From = import Builder content from exiting posts or pages
- Import / Export = import or export the Builder content (export will generate a zip file which be imported later using the import option)
- Layouts = apply pre-built Builder Layouts to the current page
- Switch to frontend = switch to frontend edit mode
Frontend Mode
The frontend edit mode works similar ast the backend mode, except it provides live preview. The image below illustrates how the Builder frontend edit works. To use the Themify Builder on frontend:
- View any post or page on the frontend (NOTE: WordPress default homepage is actually a blog archive page, you would need to create a static front page to use the Builder on homepage)
- On the frontend, from the top admin bar (make sure your Toolbar is enabled), select Themify Builder > Turn On Builder
- You will see the module panel slide up and a grid on the page
- Drag & drop the module to the grid to add modules
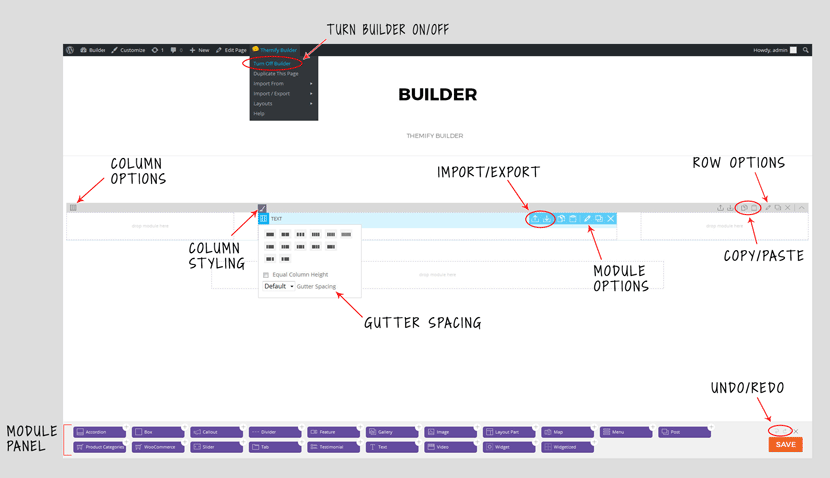
- Builder Menu
- Turn On/Off Builder = turn the Builder on/off
- Duplicate This Page = duplicate the page along with the Builder content
- Import From = import Builder content from exiting posts or pages
- Import / Export = import or export the Builder content (export will generate a zip file which be imported later using the import option)
- Layouts = apply pre-built Builder Layouts to the current page
- TIPS: if you don’t see the top admin bar (Toolbar) on the frontend, it is likely disabled. To enable top admin bar: edit your user Profile and check the “Show Toolbar when viewing site” option.
- NOTE: if you don’t see the Builder grid after turning on the Builder (but the module panel presents), it is likely because the template does not have the required WordPress function, the_content() or the template is using the_excerpt(). In this case: try to add a new post or page.
- Module Panel
- Undo/redo any Builder modifications before saving or closing the Builder
- To add modules:
- drag module from the Module Panel to the Builder column
- click on the module + icon will also add the module
- Row
- Hover over the row to see the row options icons:
- Export = export Builder data
- Import = import Builder data
- Copy = copy Builder data
- Paste = paste Builder data
- Options = row options & styling
- Duplicate = duplicate row
- Delete = delete row
- Hover over the row to see the row options icons:
- Drag row top bar up/down to re-position the row
- Column Option
- To change the column arrangement: hover the column option icon on the row and click on the desired arrangement icon. Each row can be arranged up to maximum 6 columns
- Equal Column Height: When enabled this option ensures that all the column on the same row has the same height column container
- Gutter Spacing: is the vertical spacing between columns
- Sub-columns: to make sub-columns, hover the column option icon on the module and click on the desired arrangement icon.
- NOTE: only one level of sub-columns is allowed (ie. you can’t do sub-columns within sub-columns).
- Module
- Drag and drop module to re-position the module
- Module options: (Refer to Row Options)
- Edit = edit module options (TIPS: double-click on the module overlay area will bring up module options as well)